say
Types of authorization Importance, why it is used and where it can be found What would be cool to already know before watching the video. If you don’t know something, then after watching you will study it, I will try to explain it as simply as possible. You may need to return to this video several times to better understand some topic. Look at the whole thing first, then it will be easier for you to understand
Plan:
Terminology
First, let's refresh our memory of the basic terms, we will operate with them further

Identification
Identification is the process by which a user introduces himself to the system, that is, declares who he is.
Key Features:
- This identity statement, not a check
- By itself does not guarantee that you are who you say you are
- Always precedes authentication Used in:
- Login forms (
usernameoremail) - JWT - field
sub(subject) is an identifier
Authentication
Authentication is the process of verifying a user's identity. The system must make sure that you really who you say you are.
Key methods:
- Password
- Token/certificate
- One Time Code (OTP)
- Biometrics (face, finger)
Authorization
Authorization is the process of determining what actions a user is allowed to take after successful authentication.
Key forms:
- Roles (
admin,user,moderator) - Rights (
read,write,delete) - Scopes (in OAuth2)
- ACL (access control lists)
🧠 Remember:
Authentication - this is “prove that you are you”
Authorization - “what are you allowed to do”
Base64
Base64 is a way to encode any data (text or bytes) into ASCII characters so that it can be transmitted securely over the Internet (in headers, URLs, JSON, etc.).
Base64 is a way to pack data into text. Doesn't protect, doesn't encrypt, just makes the bytes suitable for HTTP. How it works:
- Converts binary data to a set characters A-Z, a-z, 0-9, + and /.
- The exit is always string, suitable for HTTP and JSON.
- Often ends with
=(padding for alignment).
🧑💻 Examples:
# Кодирование строки:
import base64

text = "hello:world"
encoded = base64.b64encode(text.encode()).decode()
print(encoded)  # aGVsbG86d29ybGQ=

# Декодирование:
decoded = base64.b64decode(encoded).decode()
print(decoded)  # hello:world
⚠️ Important:
- Base64 is not encryption! Anyone can decode back. This is not about security, but about ease of transfer.
- For protection (eg in JWT) is used signature, not base64.
HTTP
HTTP (HyperText Transfer Protocol) is a data transfer protocol originally intended for transferring hypertext documents. In the OSI model it is located at 7, the application layer, in the TCP/IP model - at 4, also the application layer.
The HTTP protocol works on the principle client-server. The client application generates a request and sends it to the server, after which the server processes the request, generates a response and sends it back to the client. The structures of the request and response are similar: start line, headers, response body.
- The starting line of the request consists of the method, path and protocol version:
GET /index.html HTTP/1.1The starting line of the response consists of the protocol version, the response code and the text decryption of the response:HTTP/1.1 200 OK - Headers are a set of key-value pairs, e.g.
Content-Type: text/html; charset=utf-8. The headers contain request/response metadata: user language, authorization, content type, etc. - The response body can be empty, or it can transmit text, files, or binary data. The body is separated from the headers by a blank line. By default, HTTP runs on port 80. HTTPS (Hypertext Transfer Protocol Secure) is an extension of HTTP in which data is transferred not just as text, but is encrypted using TLS. By default it works on port 443. The currently used versions are HTTP/1.1 and HTTP/2. New features of HTTP/1.1:
- title
Connection: keep-alive, so as not to open a new TCP connection for each request, but to use one HTTP/2 innovations: - binary format instead of a text message, the received message does not need to be first translated into text and then parsed, now the received message is parsed immediately in binary format - this is easier than in text
- framing: requests and responses consist of one or more independent packets - frames
- multiplexing: streams are used - sequences of frames with the same stream id. There can be several streams within one connection, thereby reducing the number of TCP connections. Streams can be given priority.
- server push - the server can initiate sending resources to the client without an explicit request, for example, we were asked for an HTML page and we also send CSS in advance
- browsers support HTTP/2 only over TLS
HTTP methods
Scroll the table horizontally →
| Method | What does | Endpoint example | Safe | Idempotent |
|---|---|---|---|---|
| POST | sends data to the server | /photos | No | No |
| PUT | updates an existing resource, sometimes it can create a new one; you need to pass the full representation of the resource | /photos/id | No | Yes |
| PATCH | makes changes to a specific resource | /photos/id | No | No |
| GET | requests information | /photos, /photos/id | Yes | Yes |
| HEAD | same as GET, but only requests headers without response body | /photos, /photos/id | Yes | Yes |
| DELETE | deletes a resource | /photos/id | No | Yes |
| OPTIONS | requests information about the server, including the HTTP methods it supports; often used in the context of CORS | /photos | Yes | Yes |
| TRACE | used to test and debug the connection between client and server | /photos | No | Yes |
Idempotency - a property of an operation where repeating it with the same input has the same effect as executing it once.
Example request:
GET /index.html HTTP/1.1
Host: www.example.com
User-Agent: Mozilla/5.0 (Windows NT 10.0; Win64; x64; rv:100.0) Gecko/20100101 Firefox/100.0
Accept: text/html,application/xhtml+xml,application/xml;q=0.9,image/webp,*/*;q=0.8
Accept-Language: en-US,en;q=0.5
Accept-Encoding: gzip, deflate
Connection: keep-alive
Upgrade-Insecure-Requests: 1
Example response:
HTTP/1.1 200 OK
Date: Mon, 27 Nov 2023 12:00:00 GMT
Server: Apache/2.4.29 (Unix)
Last-Modified: Wed, 01 Nov 2023 10:00:00 GMT
ETag: "a1f-5c001a1f364d8"
Accept-Ranges: bytes
Content-Type: text/html

<!DOCTYPE html>
<html>
<head>
    <title>Example Page</title>
</head>
<body>
    <h1>Hello, World!</h1>
    <p>This is an example page.</p>
</body>
</html>
Examples of response codes
- 1xx - informational
100 Continue- the request has been accepted and the client can continue sending requests101 Switching Protocol- sent in response to a client request containing the headerUpgrade, and indicates that the server has switched to the protocol specified in the header- 2xx - successful
200 OK- the request was processed successfully201 Created- the resource was created- 3xx - redirection
304 Not Modified- used for caching: the requested resource has not changed, so the client can continue using the cached response307 Temporary Redirect- temporary redirect- 4xx - client error
401 Unauthorized- authentication is required to obtain the requested response403 Forbidden- the client does not have permission to access the content404 Not Found- the server cannot find the requested resource- 5xx - server error
500 Internal Server Error- the server encountered a situation it does not know how to handle504 Gateway Timeout- the server cannot obtain a response in time
Authentication and Authorization Mechanisms
Common mechanisms are listed below. These are not mutually exclusive alternatives: for example, an application could use OIDC for login, a server session for the browser, and an OAuth access token to call an external API.
- HTTP Basic authentication — a simple scheme for transmitting a login/password pair in each request. Only valid over HTTPS and suitable for limited scenarios.
- Session authentication — the client stores the session identifier, and the server stores the session state. Often a good choice for browser-based applications.
- Bearer token — the client presents an access token. JWT is one token format, but is not a distinct authentication protocol and is not universally the “best” choice for APIs or SPAs.
- OAuth 2.0 — delegated authorization framework. For user login over OAuth 2.0, OpenID Connect is typically used.
- Keycloak — ready-made identity and access management server with support for OIDC, OAuth 2.0, SAML, SSO and MFA.
Basic auth
Basic Auth - this is the simplest authentication method, in which the login and password are transmitted in each HTTP request as a base64-encoded string.
Basic Auth is minimalism in its purest form. Ideal when you need it simple and fast, but never use it in public applications without HTTPS. This is not a solution “for years” - this is a way to “insert a login in 30 seconds.”

How it works:
- The user enters login and password
- This data is encoded in base64:
username:passwordBase64 does not encrypt, but just encodes → needs HTTPS - Each request sends the following header:
Authorization: Basic YWRtaW46c2VjcmV0
- The server decodes the header and checks the login/password manually or through middleware
Middleware - this is intermediate layer, which processes the request up to (or after) the main request handler.
✅ Pros:
- Configures in 1 minute (for example, in
Nginxor FastAPI) - Does not require cookies, session database, token generation
- HTTP standard since the 1990s, implemented in many libraries
❌ Cons:
- Even after login - login and password are lost in every request
- Managing logout in a browser is more difficult: the browser can reuse credentials before closing the context or clearing the saved data.
- Without HTTPS, header interception reveals the login and password. HTTPS is required.
- The schema itself does not define roles, scopes, logout, or the credentials lifecycle; the application implements this if necessary.
Where applicable:
✅ Suitable:
- Admin panels “for our own”
- Internal tools (behind VPN)
- Fast MVPs, test APIs ❌ Not fits:
- Public web applications
- SPA and mobile clients
- Production without HTTPS
Example in FastAPI:
Demo example GitHub - takentui/authorization_types at fastapi-basic-auth
Documentation: HTTP Basic Auth - FastAPI
import secrets

from fastapi import Depends, FastAPI, HTTPException, status
from fastapi.security import HTTPBasic, HTTPBasicCredentials

app = FastAPI()
security = HTTPBasic()

@app.get("/secret-resource")
def read_secret(credentials: HTTPBasicCredentials = Depends(security)):
    username_ok = secrets.compare_digest(credentials.username.encode(), b"admin")
    password_ok = secrets.compare_digest(credentials.password.encode(), b"secret")
    if not (username_ok and password_ok):
        raise HTTPException(
            status_code=status.HTTP_401_UNAUTHORIZED,
            detail="Incorrect username or password",
            headers={"WWW-Authenticate": "Basic"},
        )
    return {"message": "Welcome!"}
sequenceDiagram
    title Basic Authentication в FastAPI
    actor Client as Клиент
    participant FastAPI as FastAPI сервер
    participant DB as База данных

    Client->>+FastAPI: GET /secure-resource
    FastAPI-->>Client: 401 Unauthorized<br>WWW-Authenticate: Basic
    Client->>FastAPI: GET /secure-resource<br>Authorization: Basic QWxhZGRpbjpvcGVuIHNlc2FtZQ==<br>(username:password в Base64)
    FastAPI->>+DB: Проверка логина/пароля
    DB-->>-FastAPI: Валидация результата
    alt Аутентификация успешна
        FastAPI-->>Client: 200 OK<br>+ запрошенные данные
    else Аутентификация не удалась
        FastAPI-->>Client: 401 Unauthorized
    end
    deactivate FastAPI
Application in NGINX
⚠️ This is the most common use case for basic auth
Demo example GitHub - takentui/authorization_types at nginx-basic-auth
Documentation: Restricting Access with HTTP Basic Authentication
Nginx can itself check the login and password before the request reaches the backend (for example, FastAPI, Django, etc.).
This is convenient when you need:
- Protect dev server, staging or internal API
- Place a “stub” on the admin panel
- Don't get into the application code at all
How it works:
- User accesses secure URL
- The browser shows the login/password entry window
- Nginx checks them using the file
.htpasswd - Only after this does it give access
sequenceDiagram
    title Basic Authentication через Nginx с FastAPI сервисами
    actor Client as Клиент
    participant Nginx as Nginx
    participant Service1 as FastAPI Сервис 1
    participant Service2 as FastAPI Сервис 2
    participant AuthFile as .htpasswd

    Client->>+Nginx: GET /service1/resource
    Nginx-->>Client: 401 Unauthorized<br>WWW-Authenticate: Basic
    Client->>Nginx: GET /service1/resource<br>Authorization: Basic QWxhZGRpbjpvcGVuIHNlc2FtZQ==
    Nginx->>+AuthFile: Проверка логина/пароля
    AuthFile-->>-Nginx: Результат валидации

    alt Аутентификация успешна
        Nginx->>+Service1: GET /resource<br>(внутренний запрос)
        Service1-->>-Nginx: 200 OK + данные
        Nginx-->>Client: 200 OK + данные

        Note over Client,Nginx: Запрос к другому сервису

        Client->>+Nginx: GET /service2/resource<br>Authorization: Basic QWxhZGRpbjpvcGVuIHNlc2FtZQ==
        Nginx->>AuthFile: Проверка логина/пароля
        AuthFile-->>Nginx: Результат валидации
        Nginx->>+Service2: GET /resource<br>(внутренний запрос)
        Service2-->>-Nginx: 200 OK + данные
        Nginx-->>-Client: 200 OK + данные
    else Аутентификация не удалась
        Nginx-->>Client: 401 Unauthorized
    end
Important:
- Must use HTTPS — otherwise the login/password will be sent in clear text
- Everyone has the same login/password (without logic on the application side)
- No sessions, roles, access control - only “allowed or not”
Session auth
Demo example github.com
This is an old, proven authentication method that is widely used in classic web applications (Django, Flask, Rails etc.) Session based auth operation scheme
- User logs in — sends login/password →
POST /loginwith{"username": "...", "password": "..."} - The server checks them and creates session → We save the session connection with the account in memory or database
- Server assigns a unique ID to the session (usually a random string) → Generate session_id
- This ID is sent to the user in cookie → for example,
HTTP/1.1 200 OK
Set-Cookie: sessionid=abc123; HttpOnly; Path=/; Secure
- With each subsequent request, the browser automatically sends a cookie → for example
GET /profile HTTP/1.1
Host: example.com
Cookie: sessionid=abc123
- The server finds the session by ID and “recognizes” the user → we check the session in the database and pull out the account to which the session is linked
sequenceDiagram
    title Session Authentication в FastAPI
    actor Client as Клиент
    participant FastAPI as FastAPI сервер
    participant DB as База данных
    participant Redis as Redis (хранилище сессий)

    Client->>+FastAPI: POST /login<br>{"username": "user", "password": "pass"}
    FastAPI->>+DB: Проверка логина/пароля
    DB-->>-FastAPI: Валидация результата

    alt Аутентификация успешна
        Note over FastAPI,Redis: Создание сессии
        FastAPI->>+Redis: Сохранение session_id: {user_data}<br>set("session:abc123", user_json, ex=3600)
        Redis-->>-FastAPI: OK
        FastAPI-->>Client: 200 OK<br>Set-Cookie: session_id=abc123 HttpOnly

        Note over Client,FastAPI: Последующие запросы

        Client->>+FastAPI: GET /secure-resource<br>Cookie: session_id=abc123
        FastAPI->>+Redis: Получение данных сессии<br>get("session:abc123")
        Redis-->>-FastAPI: Данные сессии (user_data)
        FastAPI-->>-Client: 200 OK + данные

        Note over Client,FastAPI: Выход пользователя

        Client->>+FastAPI: POST /logout<br>Cookie: session_id=abc123
        FastAPI->>+Redis: Удаление сессии<br>del("session:abc123")
        Redis-->>-FastAPI: OK
        FastAPI-->>-Client: 200 OK<br>Set-Cookie: session_id=abc123,expires=Thu, 01 Jan 1970...
    else Аутентификация не удалась
        FastAPI-->>Client: 401 Unauthorized
    end
✅ Pros
- Ease of implementation: easy to implement on many frameworks
- Server control: The session data is stored on the server, and the client receives only an opaque session identifier.
- Simple controls: you can easily cancel sessions, control lifetime
- Less work on the client: all authentication logic runs on the server
- Reducing the risk of cookie theft via XSS:
HttpOnlyprevents JavaScript from reading cookies. However, XSS code can still perform actions on behalf of the user, so XSS protection remains mandatory.
❌ Cons
- State storage: requires server-side session storage (memory/database/Redis)
- Scalability: it is more difficult to distribute the load between servers
- Problems with CORS: work becomes more complicated with cross-domain requests
- Vulnerability to CSRF attacks: additional protection measures required
- Performance: additional queries to session storage
Example in FastAPI:
Here is a short example of implementation using FastAPI:
This example shows a basic implementation of session authentication using FastAPI and Redis to store sessions. Key points:
- The session ID is generated as
UUIDand stored inRediswith limited lifetime - Cookie is set from
HttpOnly,Secureand suitableSameSite. State-altering requests still require CSRF protection appropriate to the application architecture - The main endpoints have been implemented: login, logout and obtaining information about the current user
- When you exit, the session is removed from
Redisand cookies are cleared
import uuid
import redis
from typing import Optional

from fastapi import Depends, FastAPI, HTTPException, Request, Response, status
from fastapi.security import HTTPBasic, HTTPBasicCredentials
from pwdlib import PasswordHash
from pydantic import BaseModel

app = FastAPI()
security = HTTPBasic()
password_hash = PasswordHash.recommended()

# Подключение к Redis
r = redis.Redis(host='localhost', port=6379, db=0)
SESSION_EXPIRE = 3600  # 1 час

# Модели данных
class User(BaseModel):
    username: str
    password: str

# Заглушка для базы данных пользователей
fake_users_db = {
    "user1": {
        "username": "user1",
        # Только для демо: в реальном приложении готовый хеш хранится в БД.
        "hashed_password": password_hash.hash("password1"),
    }
}

# Проверка учетных данных
def get_current_user(credentials: HTTPBasicCredentials = Depends(security)):
    user = fake_users_db.get(credentials.username)
    if not user or not password_hash.verify(credentials.password, user["hashed_password"]):
        raise HTTPException(
            status_code=status.HTTP_401_UNAUTHORIZED,
            detail="Неверные учетные данные",
            headers={"WWW-Authenticate": "Basic"},
        )
    return user

# Получение пользователя по сессии
def get_user_by_session(request: Request):
    session_id = request.cookies.get("session_id")
    if not session_id:
        return None

    username = r.get(f"session:{session_id}")
    if not username:
        return None

    return fake_users_db.get(username.decode())

# Маршруты
@app.post("/login")
def login(response: Response, user: User = Depends(get_current_user)):
    # Создание сессии
    session_id = str(uuid.uuid4())
    r.setex(f"session:{session_id}", SESSION_EXPIRE, user["username"])

    # Установка cookie
    response.set_cookie(
        key="session_id",
        value=session_id,
        httponly=True,
        max_age=SESSION_EXPIRE,
        samesite="lax",
        secure=True,
        path="/",
    )

    return {"message": "Успешный вход"}

@app.get("/me")
def read_user(user: Optional[dict] = Depends(get_user_by_session)):
    if not user:
        raise HTTPException(
            status_code=status.HTTP_401_UNAUTHORIZED,
            detail="Требуется аутентификация"
        )
    return {"username": user["username"]}

@app.post("/logout")
def logout(response: Response, request: Request):
    session_id = request.cookies.get("session_id")
    if session_id:
        r.delete(f"session:{session_id}")

    response.delete_cookie(key="session_id")
    return {"message": "Выход выполнен успешно"}
Token based auth
Scheme of token-based authorization (without refresh token)
- The user submits a login and password
→
POST /loginwith{"username": "...", "password": "..."} - Server verifies credentials → Compares the login and password with the login-password from the database/storage.
- The server creates a JWT access token → Using the function from point 2. Essentially generates a special string and doesn't keep it, simply returns as the result of the method
- The token is returned to the user
→ In the body of the response or
HttpOnlycookie - The client stores or holds the token
→ The storage option is selected based on the threat model.
localStorageJavaScript is available and is particularly sensitive to XSS.HttpOnlyThe cookie is not accessible by JavaScript, but is sent automatically by the browser and requires CSRF protection. Cookies are not automatically made secure: importantSecure,HttpOnly, suitableSameSiteand protecting the application from XSS.
LocalStorage — browser storage where you can save data in the format
ключ:значение.
- Further requests come with a token
→ In the title:
Authorization: Bearer <token> - The server verifies the signature and
exptoken → If everything is ok, the user is authorized - If exp passes, then the token is no longer valid.
→ Return to point 1.
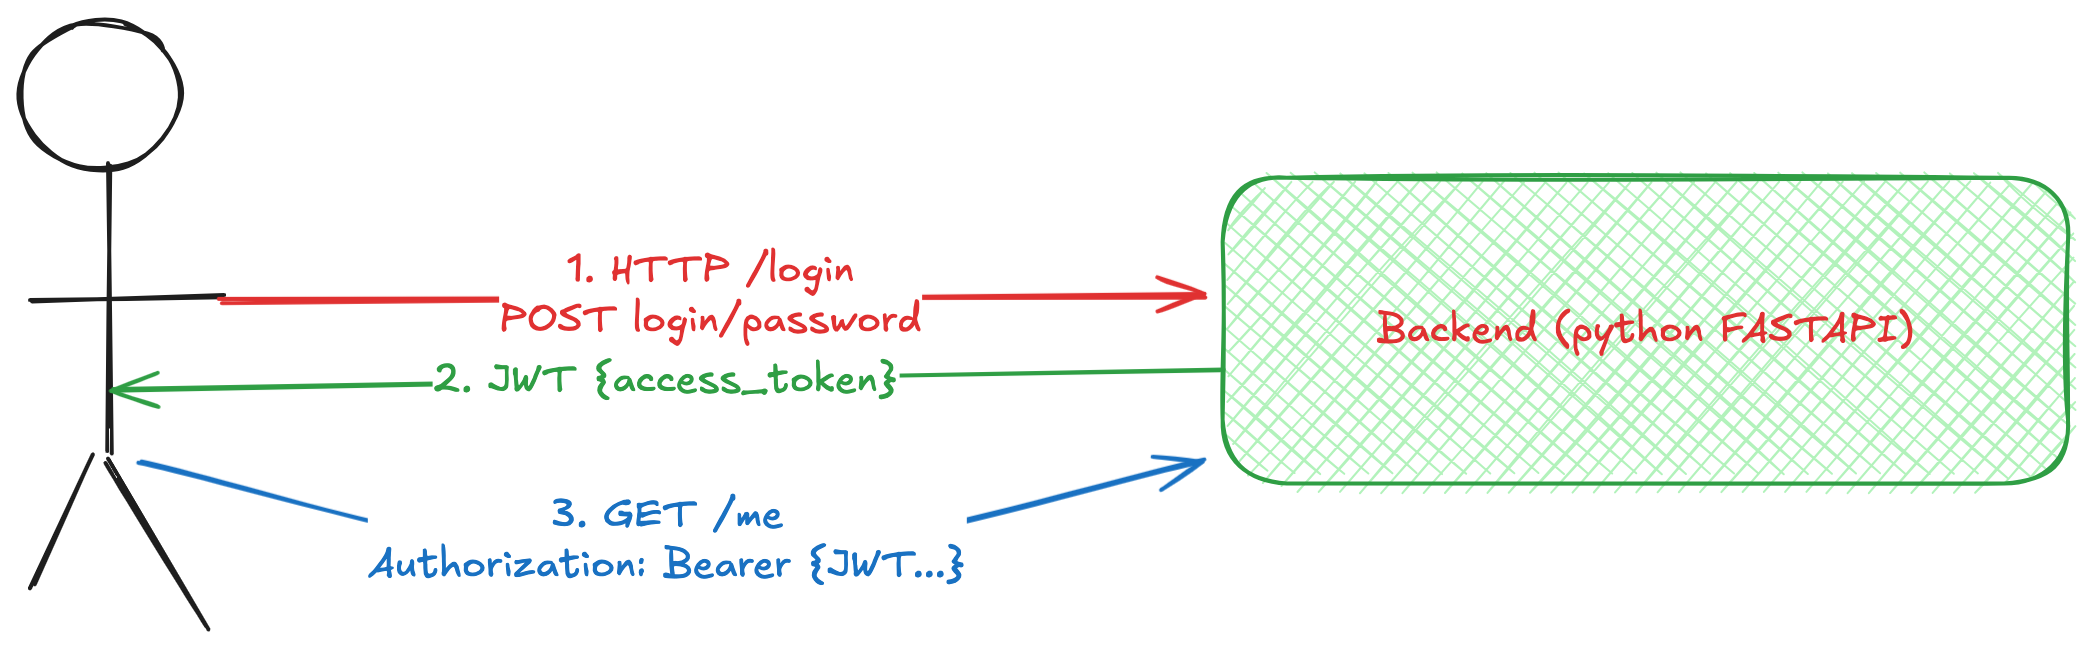
The Access token can be an opaque random string or a structured token such as a JWT. Format selects authorization server; resource server should not assume JWT unless contractually mandated.
JWT
RFC 7519 - JWT standard. Website JWT.io useful as a debugging tool and library directory, but is not a normative specification.
Demo example GitHub - takentui/authorization_types at jwt-auth
JWT (JSON Web Token) — token format. Often the JWT is represented by a signed compact JWS in three parts
header.payload.signature; The encrypted compact JWE consists of five parts. Each part:
- Header — metadata: token type and signature algorithm
- Payload — data (claims): who you are, validity period, roles, etc.
- Signature — digital signature (authentication)
Bearer access token is usually sent in the HTTP header Authorization: Bearer {your_token_here} according to RFC 6750. Base64url provides a compact ASCII representation that is useful for URLs and headers, but does not encrypt the data or ensure data privacy. The payload of a signed JWT can usually be read without a key.
How to create a JWT
example token
eyJhbGciOiJIUzI1NiIsInR5cCI6IkpXVCJ9.eyJzdWIiOiIxMjM0NTY3ODkwIiwibmFtZSI6IkpvaG4gRG9lIiwiYWRtaW4iOnRydWUsImlhdCI6MTUxNjIzOTAyMn0.KMUFsIDTnFmyG3nMiGM6H9FNFUROf3wh7SmqJp-QV30
Let's first look at what information it can store and then understand how to make our own token.
Header:
{
"alg": "HS256",
"typ": "JWT"
}
Payload:
{
  "sub": "1234567890", // user ID
  "name": "John Doe", // имя пользователя
  "admin": true, // роль пользователя
  "iat": 1516239022, // время выпуска: NumericDate
  "exp": 1716666000 // время истечения: NumericDate
}
Signature:
The JWT can be signed or encrypted depending on the JOSE application. For bearer access token accept unsigned JWT (alg: none) is usually not possible: the resource server must limit the allowed algorithms in advance and check the signature, issuer, audience, expiration date and other expected claims.
a-string-secret-at-least-256-bits-long
Example of token generation:
You can run it locally by installing the package pyJWT.
import os
from datetime import datetime, timedelta, timezone

import jwt

# Сгенерируйте, например: openssl rand -hex 32.
# Секрет храните вне репозитория — в secret storage или переменной окружения.
SECRET_KEY = os.environ["JWT_SECRET_KEY"]
ALGORITHM = "HS256"

def generate_token(data: dict):
    payload = data.copy()
    payload["exp"] = datetime.now(timezone.utc) + timedelta(minutes=15)
    return jwt.encode(payload, SECRET_KEY, algorithm=ALGORITHM)

# Пример использования
token = generate_token({"sub": "user_id_123"})
print(token)
What goes into the payload? (So-called claims)
Scroll the table horizontally →
| Claim | Purpose | Required? |
|---|---|---|
| sub | User ID | Depends on token profile |
| exp | Token expiration time (timestamp) | Depends on token profile |
| iat | When was it released? | ⚠️ Preferable |
| nbf | “Not before” (not before) | ❌Optional |
| iss | Who issued the token (issuer) | ❌Optional |
| aud | Who is the token intended for (audience) | ❌Optional |
| Custom | For example, role, email, scopes | ❌Optional |
Signature algorithms: HS256 vs RS256
- HS256 — a symmetric signature: everyone who can verify the token knows the shared secret and can technically sign new tokens.
- RS256 — an asymmetric signature: the private key signs the token, and the public key verifies it. This is useful when several resource servers verify tokens without access to the signing key. The algorithm choice depends on the architecture and security policy.
You can start with HS256, and in the full project move to RS256 or integration with Keycloak, where this works automatically.
⚠️ Common mistakes:
- ❌ Omitting exp (creating tokens that never expire)
- ❌ Including a password or sensitive data in the token
- ❌ Using a secret that is too short or weak:
SECRET_KEY - ❌ Sending the token without the Bearer scheme in the header
- ❌ Not verifying the signature on the server
Refresh token flow
A refresh token is used to obtain a new
access tokenwithout authenticating the user again. The basic flow is:
- Upon authorization, the client receives two tokens:
- Access token (short-lived, for example 15-30 minutes)
- Refresh token (long-lived, for example 7-30 days)
- When an access token expires:
- The client sends
refreshtoken to a special endpoint (for example,POST /refresh) - The server checks the validity
refreshtoken - If the check is successful, the server generates a new
accesstoken and returns it to the client - Optional: generates a new one
refreshtoken (rotation strategy)
- Update request scheme:
POST /refresh
Content-Type: application/json

{
  "refresh_token": "eyJhbGciOiJIUzI1NiIsInR5cCI6IkpXVCJ..."
}
- Answer:
{
  "access_token": "eyJhbGciOiJIUzI1NiIsInR5cCI6IkpXVC...",
  "refresh_token": "eyJhbGciOiJIUzI1NiIsInR5cCI6IkpXVC...", // Опционально
  "token_type": "Bearer",
  "expires_in": 900
}
Features of refresh tokens:
- Structure: Can be JWT or opaque random strings with sufficient entropy.
- Server storage: Depends on the design of the authorization server. Rotation, reuse detection, and revocation typically require server state; It is advisable to protect secret tokens in the vault as carefully as other credentials.
- Client storage: For browser client often used
HttpOnly,Securecookies with suitableSameSite, but the specific scheme depends on the architecture and threat model. - Lifespan: Much longer
accesstoken, but has an expiration date
Implementation guidelines:
- Create a unique
refreshtoken for each user device - For public clients, use rotation refresh token or sender-constrained refresh token and detect reuse of old token.
JWT review (revoke)
One of the disadvantages of JWT is the difficulty of revoking tokens, since they are valid until expiration by default. There are several approaches to solving this problem:
- Blacklist of revoked tokens
# Пример хранения отозванных токенов в Redis
def revoke_token(token):
    token_data = jwt.decode(token, SECRET_KEY, algorithms=[ALGORITHM])
    jti = token_data["jti"]  # уникальный ID конкретного токена
    ttl = token_data["exp"] - int(datetime.now(timezone.utc).timestamp())
    if ttl > 0:
        redis_client.setex(f"revoked:{jti}", ttl, "1")

def is_token_revoked(token):
    token_data = jwt.decode(token, SECRET_KEY, algorithms=[ALGORITHM])
    jti = token_data["jti"]
    return redis_client.exists(f"revoked:{jti}")
- Control via Refresh tokens
- Store only refresh tokens in the database
- When logout, remove the refresh token from the database
- Keep the lifespan of access tokens short
- Release with version/user session ID
def generate_token(user_id, session_id):
    return jwt.encode({
        "sub": user_id,
        "jti": str(uuid.uuid4()),
        "sid": session_id,  # Идентификатор сессии
        "exp": datetime.now(timezone.utc) + timedelta(minutes=15)
    }, SECRET_KEY, algorithm=ALGORITHM)

def verify_token(token, active_sessions):
    payload = jwt.decode(token, SECRET_KEY, algorithms=[ALGORITHM])
    # Проверяем не только подпись, но и актуальность сессии
    if payload["sid"] not in active_sessions.get(payload["sub"], []):
        raise Exception("Token revoked")
    return payload
How it works
sequenceDiagram
    title JWT Authentication в FastAPI
    actor Client as Клиент
    participant FastAPI as FastAPI сервер
    participant DB as База данных
    participant Redis as Redis (для revoked токенов)

    Client->>+FastAPI: POST /login<br>{"username": "user", "password": "pass"}
    FastAPI->>+DB: Проверка логина/пароля
    DB-->>-FastAPI: Валидация результата

    alt Аутентификация успешна
        Note over FastAPI: Создание JWT-токенов
        FastAPI-->>Client: 200 OK<br>{"access_token": "eyJhbGci...", "refresh_token": "eyJhbGci...", "token_type": "bearer"}

        Note over Client,FastAPI: Запрос с access_token

        Client->>+FastAPI: GET /secure-resource<br>Authorization: Bearer eyJhbGci...
        Note over FastAPI: Проверка JWT подписи<br>и проверка exp/nbf claims
        FastAPI->>+Redis: Проверка отозванности<br>exists("revoked:token_jti")
        Redis-->>-FastAPI: Результат (0/1)

        alt Токен валидный
            FastAPI-->>-Client: 200 OK + данные
        else Токен невалидный или отозван
            FastAPI-->>Client: 401 Unauthorized
        end

        Note over Client,FastAPI: Обновление токена при истечении срока

        Client->>+FastAPI: POST /refresh<br>{"refresh_token": "eyJhbGci..."}
        Note over FastAPI: Проверка refresh_token
        FastAPI->>+Redis: Проверка отозванности<br>exists("revoked:refresh_token_jti")
        Redis-->>-FastAPI: Результат (0/1)

        alt Refresh токен валидный
            Note over FastAPI: Генерация новых токенов
            FastAPI->>+Redis: Добавление старого в черный список<br>setex("revoked:refresh_token_jti", ttl, "1")
            Redis-->>-FastAPI: OK
            FastAPI-->>-Client: 200 OK<br>{"access_token": "eyJhbGci...", "refresh_token": "eyJhbGci...", "token_type": "bearer"}
        else Refresh токен невалидный или отозван
            FastAPI-->>Client: 401 Unauthorized
        end

        Note over Client,FastAPI: Выход пользователя

        Client->>+FastAPI: POST /logout<br>Authorization: Bearer eyJhbGci...
        FastAPI->>+Redis: Добавление токена в черный список<br>setex("revoked:token_jti", ttl, "1")
        Redis-->>-FastAPI: OK
        FastAPI-->>-Client: 200 OK
    else Аутентификация не удалась
        FastAPI-->>Client: 401 Unauthorized
    end
✅ Pros:
- Stateless - the server does not store sessions, which simplifies scaling
- Self-sufficiency - all necessary information is contained in the token
- Cross-domain work - easy to use in microservice architecture
- Productivity - no need to access the database to check authorization
- Flexibility - you can include various claims (roles, rights, etc.)
- Standardization - widely used format with many libraries
- Sharing of Responsibility - the ability to separate authorization into a separate service
❌ Cons:
- Size - JWT is usually larger than session ID (especially with a large number of claims)
- Difficulty of review - no built-in recall mechanism (additional implementation is needed)
- Storage security - difficult to store securely on the client
- Information leak - payload is not encrypted, only Base64 encoded
- Complication when using refresh tokens - requires state storage
- Risk of XSS attacks - if stored incorrectly in localStorage
- Immutability - you cannot change the data in the token without re-issuing it
- Expired Tokens - until the expiration date, the client continues to use the outdated token
Where to store the token on the client
Scroll the table horizontally →
| Storage | Access Token | Refresh Token | Comment |
|---|---|---|---|
| HttpOnly Cookie | ✅ Okay | ✅ Best option | XSS protection, vulnerable to CSRF (additional protection required) |
| localStorage | ❌ Unsafe | ❌ Very unsafe | Vulnerable to XSS attacks |
| sessionStorage | ⚠️ Relatively safe | ❌ Unsafe | Lives only during a browser session |
| Memory (JS variable) | ✅ Okay | ⚠️ Not recommended | Disappears on page refresh |
| IndexedDB | ⚠️ Depends on implementation | ❌ Unsafe | Requires encryption |
Recommended approach:
- Access token:
HttpOnlycookie or in-memory storage - Refresh token: only
HttpOnly,Secure,SameSite=strict cookie
Additional security measures:
- Anti-CSRF tokens
- Generate a unique token for each session
- Check it for requests that change state
- Device fingerprinting
- Bind the refresh token to the device's characteristics
- Check that they match when refreshing the token
SSO (Single-sign on)
SSO (Single Sign-On) — a mechanism that lets a user log in once to access all connected systems without authenticating again.
🎯 SSO itself is behavior, not technology. And it is implemented through Keycloak, Okta, Azure AD, etc.
- User — wants to log in, knows his username and password
- Service Provider (SP) — the site he visits (for example, GitLab)
- Identity Provider (IdP) — a service that confirms identity (for example, Keycloak, Google, Okta)
What it looks like for the user:
- You go to
app1.company.com→ log in - Go to
app2.company.com→ already logged in - You go to
dashboard.partner.com→ also logged in → without entering a password
How it works under the hood
- The user goes to
Service A - It will be redirected to IdP
- He logs in once
- IdP returns token or session
- The user gets access to
Service A - When switching to
Service B, he again turns to IdP → there is already a session → login without password
SSO works through the following protocols:
- SAML - old, XML, often in enterprise
- OpenID Connect (OIDC) - an add-on to OAuth2, a modern standard
- Sometimes - Kerberos (in Windows domain networks)
Example:
Let's say you have three applications:
billing.domain.comdocs.domain.comadmin.domain.comWith SSO:- They all trust the same IdP (e.g. Keycloak)
- The user logs in once and gets access to all three
✅ Pros of SSO
- Convenient for users (1 login → many accesses)
- Centralized security control
- Ideal for enterprise environments, microservices
- Supports MFA, LDAP, OAuth2, Google Login, etc.
❌ Cons
- One point of failure (if the IdP doesn't work, no one will log in)
- You need to be able to configure correctly
- Requires understanding of protocols (OIDC/SAML)
OAuth 2.0 and OpenID Connect
OAuth 2.0 is an authorization protocol that allows an application to access user data on another service, without transferring a login and password.
🎯 OAuth 2.0 is not an authentication protocol, but delegated access to resources. OpenID Connect (OIDC) is used to log in a user over OAuth 2.0. “OAuth2 is a protocol that allows applications to act on behalf of a user without knowing their password. Everything is through tokens, everything is under control.”
Example:
You log in to the site via Google:
- This site doesn't receive your password
- Google shows: “This app wants access to your mail”
- You click “Allow”
- The application receives token - and can read your letters (or whatever they requested)
Who is involved in the process
- Resource Owner — user (you)
- Client — the application that wants access (for example, Zoom, Notion)
- Authorization Server — who issues the token (for example, Google)
- Resource Server — API that the client wants access to (for example, Gmail API)
Main login flow: OIDC Authorization Code Flow
Stages:
- The client creates
state, and for public clients - also PKCEcode_verifier/code_challenge, stores the values for the duration of the operation and redirects the user to the authorization endpoint:
https://accounts.google.com/o/oauth2/v2/auth?response_type=code&client_id=...&redirect_uri=...&scope=openid%20profile%20email&state=...&code_challenge=...&code_challenge_method=S256
- The user logs in and allows access
- Google redirects back from
code:
https://your-app.com/callback?code=abc123&state=...
- Client checks
stateand exchanges one-timecodealong withcode_verifieron access token and, if allowed, a refresh token. - The client uses the received access token. OAuth 2.0 does not require this token to be a JWT:
Authorization: Bearer <token>
sequenceDiagram
    title OAuth 2.0 в FastAPI (Authorization Code Flow)
    actor Client as Клиент
    participant FastAPI as FastAPI сервер
    participant OAuth as OAuth 2.0 сервер
    participant DB as База данных

    Client->>+FastAPI: GET /login
    FastAPI-->>-Client: Redirect на OAuth сервер<br>302 Location: https://oauth-provider.com/authorize?client_id=xyz&redirect_uri=...

    Client->>+OAuth: GET /authorize?client_id=xyz&...
    OAuth-->>-Client: Страница входа OAuth провайдера

    Client->>+OAuth: POST /authorize (ввод логина/пароля)
    OAuth-->>-Client: Redirect на redirect_uri<br>302 Location: https://your-app.com/callback?code=auth_code

    Client->>+FastAPI: GET /callback?code=auth_code
    FastAPI->>+OAuth: POST /token<br>code=auth_code&client_id=xyz&client_secret=secret
    OAuth-->>-FastAPI: {"access_token": "token", "refresh_token": "refresh", ...}

    FastAPI->>+OAuth: GET /userinfo<br>Authorization: Bearer token
    OAuth-->>-FastAPI: {"sub": "123", "name": "User", "email": "..."}

    FastAPI->>+DB: Сохранение/обновление данных пользователя
    DB-->>-FastAPI: OK

    Note over FastAPI: Создание сессии

    FastAPI-->>-Client: Redirect на главную страницу<br>302 Location: / + Set-Cookie: session=...

    Note over Client,FastAPI: Последующие запросы с сессионной cookie

    Client->>+FastAPI: GET /secure-resource<br>Cookie: session=...
    FastAPI-->>-Client: 200 OK + данные

    Note over Client,FastAPI: Обновление OAuth токена (при необходимости)

    FastAPI->>+OAuth: POST /token<br>grant_type=refresh_token&refresh_token=refresh&client_id=xyz&client_secret=secret
    OAuth-->>-FastAPI: {"access_token": "new_token", "refresh_token": "new_refresh", ...}

    Note over Client,FastAPI: Выход

    Client->>+FastAPI: GET /logout
    FastAPI-->>-Client: 200 OK<br>Set-Cookie: session=, expires=Thu, 01 Jan 1970...
Access and refresh token
Refresh token allows you to request a new access token without re-engaging the resource owner. It is specific to OAuth 2.0, not a JWT feature, and may itself be an opaque string.
- Access Token — temporary (often 1 hour), used for API requests
- Refresh Token - durable, used to obtain a new access token without login
OAuth ≠ Login
OAuth is not about “who are you”, it is about “can you do this”.
But if add OIDC (OpenID Connect) - ID Token appears, and you can use OAuth2 as login (SSO).
✅ Pros of OAuth2
- Does not require transferring logins/passwords to other services
- You can restrict access by scope (
read,write,profile) - Works with most major APIs
- Basic protocol for “Log in with Google/Facebook/GitHub”
❌ Cons
- Complex configuration (client_id, redirect_uri, state)
Safety Standards and Recommendations
- RFC 9700: Best Current Practice for OAuth 2.0 Security
- RFC 6749: OAuth 2.0 Authorization Framework
- RFC 7636: Proof Key for Code Exchange (PKCE)
- OpenID Connect Core 1.0
- OWASP Session Management Cheat Sheet
- There are many options (flows): authorization code, client credentials, etc.
- If done incorrectly, it is easy to open a vulnerability
Keycloak (SSO / OpenID Connect)
Keycloak is a ready-made user and authorization management system that implements the OIDC (OpenID Connect) and OAuth2.0 protocols. She provides SSO, MFA, login through third-party services and centralized access control.
Keycloak is all in one: login, tokens, roles, users, OAuth2, OIDC, MFA and SSO.
How it works:
- The user clicks “Login” in one of the applications
- The browser redirects to Keycloak
- Keycloak logs in the user (via form, LDAP, Google, etc.)
- Returns the user with
codeback to application - The application exchanges
codeonaccess token,ID token,refresh token - The user gains access to the service
- In another application the user already authorized (SSO)
Mechanics (technically):
- Keycloak is Identity Provider (IdP)
- Works through OIDC (adds authentication to OAuth2)
- Issues tokens:
- Access token (API access)
- ID token (user information)
- Refresh token (token update)
- Supports:
- JWT (RS256 by default)
- Google/GitHub/LDAP as third party IdPs
- MFA (2FA), access policies, roles, groups
sequenceDiagram
    title Keycloak Authentication в FastAPI
    actor Client as Клиент
    participant FastAPI as FastAPI сервер
    participant Keycloak as Keycloak сервер
    participant DB as База данных FastAPI

    Note over Client,Keycloak: Вход через Keycloak

    Client->>+FastAPI: GET /login
    FastAPI-->>-Client: Redirect на Keycloak<br>302 Location: https://keycloak.com/realms/my-realm/protocol/openid-connect/auth?...

    Client->>+Keycloak: GET /realms/my-realm/protocol/openid-connect/auth?...
    Keycloak-->>-Client: Форма входа Keycloak

    Client->>+Keycloak: POST /realms/my-realm/protocol/openid-connect/auth<br>(логин/пароль)

    alt Успешная аутентификация
        Keycloak-->>-Client: Redirect на callback<br>302 Location: https://your-app.com/auth/callback?code=...

        Client->>+FastAPI: GET /auth/callback?code=...
        FastAPI->>+Keycloak: POST /realms/my-realm/protocol/openid-connect/token<br>code=...&client_id=...&client_secret=...
        Keycloak-->>-FastAPI: {"access_token": "eyJ...", "refresh_token": "eyJ...", "id_token": "eyJ..."}

        FastAPI->>+Keycloak: GET /realms/my-realm/protocol/openid-connect/userinfo<br>Authorization: Bearer eyJ...
        Keycloak-->>-FastAPI: {"sub": "uuid", "email": "user@example.com", "name": "User Name", "roles": ["user"]}

        FastAPI->>+DB: Сохранение/обновление данных пользователя и ролей
        DB-->>-FastAPI: OK

        FastAPI-->>-Client: 302 Redirect на / + Set-Cookie: session=...

        Note over Client,FastAPI: Использование сервиса с сессией

        Client->>+FastAPI: GET /secure-resource<br>Cookie: session=...

        alt Доступ разрешен
            FastAPI-->>-Client: 200 OK + данные
        else Доступ запрещен
            FastAPI-->>Client: 403 Forbidden
        end
    else Неудачная аутентификация
        Keycloak-->>Client: Ошибка входа
    end

    Note over Client,FastAPI: Проверка ролей

    Client->>+FastAPI: GET /admin-resource<br>Cookie: session=...

    note over FastAPI: Проверка роли "admin"<br>из токена Keycloak

    alt Роль "admin" присутствует
        FastAPI-->>-Client: 200 OK + данные
    else Роль "admin" отсутствует
        FastAPI-->>Client: 403 Forbidden
    end

    Note over Client,Keycloak: Выход из системы

    Client->>+FastAPI: GET /logout
    FastAPI->>+Keycloak: POST /realms/my-realm/protocol/openid-connect/logout<br>refresh_token=...
    Keycloak-->>-FastAPI: OK
    FastAPI-->>-Client: 302 Redirect на /<br>+ Set-Cookie: session=, expires=Thu, 01 Jan 1970...
✅ Pros:
- Centralized authentication
- Full SSO. Included in one thing - authorized in everything
- Standards support: OIDC, OAuth2, SAML
- Flexibility: UI login, MFA, roles, policies, custom flows
- Scalable and stable: Great for production/enterprise
❌ Cons:
- We need to deal with realms, clients, mappings
- Requires a server with Keycloak or Docker
- Single point of failure (IdP): If Keycloak is down, no one will enter
- Difficult for small projects
Where applicable:
✅ Suitable:
- Microservice architecture
- Enterprise platforms
- Applications with multiple clients and roles
- SSO via Google, GitHub, LDAP ❌ Not fits:
- Simple projects without complex users
- MVP with one input
- Where there is no infrastructure
Example on FastAPI:
- The application is registered as "Client" in Keycloak
- User logs in → returns
code - FastAPI exchanges
codefor tokens via HTTP request:
import os

import httpx


async def exchange_code_for_token(code: str, code_verifier: str):
    # До вызова нужно проверить state из callback против сохранённого значения.
    async with httpx.AsyncClient(timeout=10) as client:
        response = await client.post(
            "https://keycloak.example/realms/myrealm/protocol/openid-connect/token",
            data={
                "client_id": "myapp",
                "client_secret": os.environ["OIDC_CLIENT_SECRET"],
                "grant_type": "authorization_code",
                "code": code,
                "code_verifier": code_verifier,
                "redirect_uri": "https://myapp.example/callback",
            },
        )
        response.raise_for_status()
        return response.json()
Comparison of authorization types
The table is a guideline, not a universal rating. Security and scalability depend on the threat model, implementation, credentials/tokens storage, revocation, key rotation and infrastructure.
Scroll the table horizontally →
| Criterion | 🟤 Basic Auth | 🔵 Session Auth | 🟢 JWT Auth | 🟣 OAuth 2.0 | 🟡 Keycloak (OIDC/SSO) |
|---|---|---|---|---|---|
| Type | Easy password transfer | Sessional (stateful) | Token-based; may require server state | Authorization protocol | IdP platform (OAuth2/OIDC implementation) |
| State storage | Stateless (per request) | On the server (memory, database) | Depends on revocation, sessions and permissions checking | Authorization server stores clients, grants, keys and often refresh/revocation state | IdP stores users, clients, keys and sessions |
| Where the data is stored | In the header Authorization |
In cookie (sessionid) | In the JWT token (payload) |
In tokens (access/refresh) | In tokens, managed by IdP |
| Storage mechanism | Base64: user:pass |
Set-Cookie: sessionid |
Authorization: Bearer <jwt> |
Authorization: Bearer <token> |
Authorization: Bearer <token> |
| Can you log out? | The scheme does not standardize logout | ✅ Yes | ⚠️ Partially (via blacklist) | Depends on token type and revocation endpoint support | ✅ Yes (via endpoint or IdP logout) |
| Ease of implementation | 🟢 Very simple | 🟡 Simple | 🟡 Average | 🔴 Complex (flows, scopes) | 🔴 Complex (Keycloak, settings, UI) |
| Good for APIs? | Yes, for simple trusted clients | Yes, especially for browser/BFF | Yes, if the JWT matches the contract | Yes, for delegated access | Yes, for centralized identity/access management |
| SSO support | ❌ No | ❌ No | ⚠️ Partially (self-written IdP) | Via OIDC, not OAuth itself | ✅ Full SSO |
| Role/scope support | Implements the application | ✅ On the server | In claims and/or on the server; data may become outdated | ✅ In scopes |
✅ Via UI, tokens, RBAC |
| Security | Requires HTTPS and secure storage of credentials | Requires Secure/HttpOnly cookie, CSRF protection and rotation | Depends on signature, claims, storage, lifespan and revocation | Depends on correct flow, PKCE/state and token policy | Depends on configuration, updates, MFA and policies |
| Scalability | Depends on checking credentials and backend | Requires a scalable session store or sticky sessions | Local checking is convenient, but revocation/permissions may require state | Depends on authorization server and resource servers | Depends on IdP cluster and external storages |
| Suitable for microservices | Possible, but rarely convenient | Possible via gateway/BFF or shared session store | Yes, if issuer/audience/permissions are checked correctly | Yes, for delegated access between participants | Yes, when you need a centralized IdP |
| When to use | Temporary internal APIs | Classic forms/sites | Modern SPA/API | Google Login/API Access | Corporate, SSO, production platforms |